


Data can provide a competitive edge for your firm, helping you accelerate deals, uncover strategy gaps, and boost team efficiency. But only when it’s used effectively.
To unlock the full potential of your data, you need tools that deeply understand private capital workflows. Affinity Analytics consolidates your most critical deal and relationship data into intuitive dashboards, saving hours on reporting and providing relevant insights for your team, limited partners (LPs), and portfolio companies.

In this guide, we explore how to create custom dashboards in Affinity Analytics. We also share the top ways leading private capital firms use the tool, including how to:
- Identify untapped opportunities within your deal pipeline
- Measure the return on investment (ROI) of your sourcing strategies
- Increase your team's efficiency and customer relationship management (CRM) system adoption
For a refresher on the core features of Affinity Analytics, or to learn about our standardized templates (Funnel Analysis, List Summary, Team Activity, and Introductions Summary), check out part one of this guide, Affinity Analytics for private capital: Getting started.
Who can use Affinity Analytics? All Scale, Advanced, and Enterprise users.
Creating custom dashboards
The particularities of private capital firms often require tailored analytics. For example, your investment thesis may focus on specific metrics that aren’t captured in standard reports, different teams may need different views of your pipeline data, or your firm's key performance indicators (KPIs) may evolve as your portfolio grows.
Affinity Analytics’ custom dashboards meet these needs by giving you full control over what you measure and how you visualize it.
In this section, we’ll walk through how to set up a dashboard from scratch, add content and visualizations, and make formatting changes to reflect your firm’s requirements.
1. Set up your custom dashboard

- To create a dashboard from scratch, navigate to any Affinity list.
- Click the plus (+) sign at the top right corner and select New Dashboard. This will open a blank canvas where you can start building your dashboard.
- Next, click into the existing dashboard name at the top left to rename it.
- Lastly, click Edit Dashboard at the bottom of the page to start adding tiles and visualizations, which is where the real customization begins.
Pro tip: You must be assigned a Creator role (not a Viewer role) to create a dashboard.
2. Add text tiles to organize your dashboard
Once you’ve created a blank dashboard, the next step is to populate it with "tiles"—individual components that display your data. Think of tiles as the building blocks of your dashboard; each one answers a specific question about your data.
There are two types of tiles: text tiles and visualization tiles.
Text tiles are used to add context, headings, or descriptions for different sections of your dashboard. To create a text tile, click the Add Tile button at the top of the dashboard and select Text from the options in the blue banner.

As you add tiles to your dashboard, they will be automatically sized and placed at the bottom, but you can move and resize them, or make further edits, by clicking the ellipsis (three-dotted icon) at the top-right corner of the tile.
Pro tip: By default, your new dashboard is set to private, so only you can view it unless you change the privacy settings. To enable a shared view with your team, click on the lock icon at the top of the dashboard and select Shared.
3. Use visualization tiles to build out your dashboard
The heart of any dashboard is its visualizations. Visualization tiles present your data in charts, graphs, or tables, which allows you to surface metrics like deals won, total deals by owner and month, deals added in the last 7 days, and deal funnel analysis.

To create a visualization tile, click the Add Tile button at the top of the dashboard and select Visualization. From there, you’ll connect your tile to an Affinity list—like a deal pipeline or portfolio companies list.
This opens a new window where you can start building out your report. Name your query, then select the fields and filters you want to apply (e.g., date added by month or count of organizations).

Within visualization tiles, you’ll encounter two important terms: dimensions and measures. Dimensions represent what you're measuring (like industry or deal owner), while measures define how you're quantifying that data (like deal count or total value).
For example, to create a visualization showing deal count by industry:
- Choose Count of Organizations as your measure.
- Select Industry as your dimension.
- Pick a visualization type that fits the data (e.g., a bar chart).
The dashboard will instantly generate your visualization, which you can further refine with filters, formatting, and additional dimensions.
Pro tip: Measures appear as orange columns in the data table, making them easy to identify.
4. Format your tiles to emphasize key metrics
After setting up your text tiles and visualization tiles, it’s time to fine-tune their appearance for maximum impact. Customizing the formatting of your dashboard not only improves the aesthetics but, more importantly, ensures that key metrics stand out and convey the right message to the intended audience.
To start, click the ellipsis in the top right corner of any tile. You’ll then see options to adjust the style.
Here are a few ways to format your tiles:
- Colors: Change the background color of individual tiles and add borders to distinguish one metric from another, or to group similar metrics together visually to help viewers quickly scan the data and focus on critical insights.
- Progress bars: Highlight progress toward KPIs (like win rates or fundraising targets). To add a progress bar beneath a value tile: Click Edit > Comparison > Show and navigate to Value Labels > select Calculate Progress (with Percentage).

- Grouping data values: Combine multiple field values into a single custom category. For example, instead of analyzing dozens of individual industries, you can group them into broader sectors like "Enterprise SaaS" or "Healthcare IT.” To group values in a chart, hover over the field you want to group, click the ellipsis, and select Group. After naming your group, choose the values to combine, then remove the original column to see the grouped total.
Pro tip: Use consistent color formatting for KPIs—show green for KPIs that are on track, yellow for those at risk, and red for those falling short.
5. Filter and pivot your dashboards for deeper insights
The real power of custom dashboards comes from slicing your data in ways that reveal patterns, relationships, and outliers. Two important ways to do this in Affinity Analytics are using filters and pivots.
There are two types of filters in Affinity Analytics:
- Static filters
- Cross-filters
Static filters
These are filters at the top of your dashboard (e.g. Date Added and Owner and any new filters you create) that instantly update all tiles and help you narrow the data shown in your dashboard.

For example, you can apply the Date Added filter to limit the results on your dashboard to the last two quarters, or filter by Owner” to evaluate results by team member.
Cross-filters
Cross-filters make it easier to understand how one metric in your dashboard affects another. With cross filtering, you can click a datapoint in a tile, and all dashboard tiles will automatically filter on that value.
For example, if you want to see all of the Enterprise organizations in a deal list, click on Enterprise in a tile, and every tile in your dashboard will update to show the Enterprise industry group.
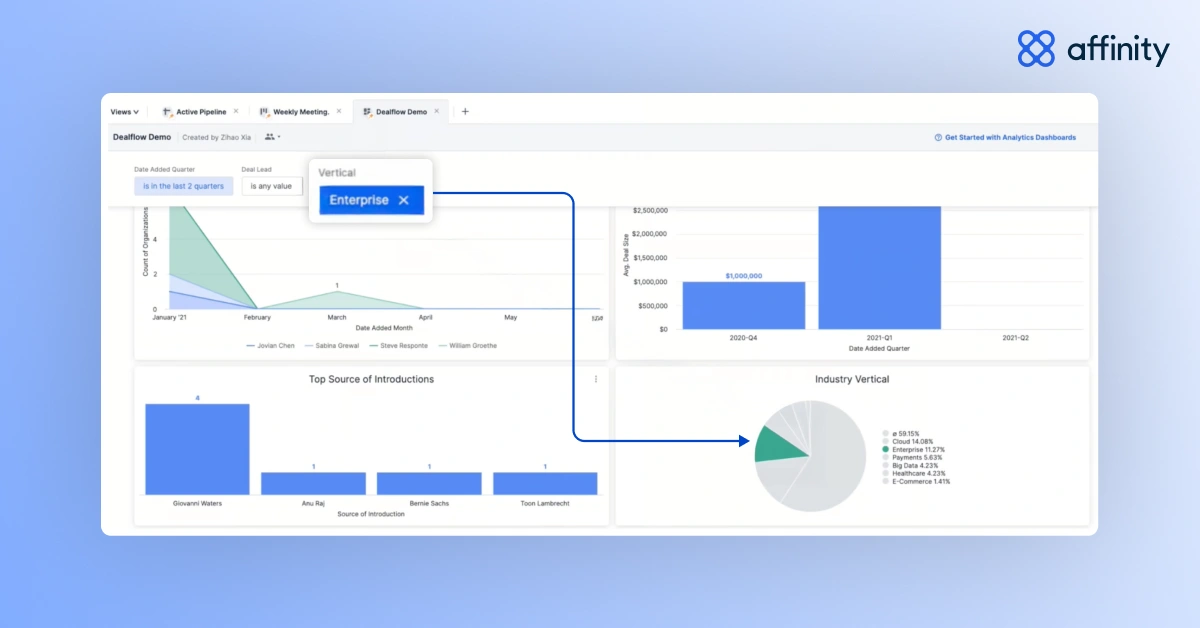
Cross-filters are only available if every tile you built in a dashboard is reporting on the same underlying list (e.g. the same deal list).
To create a filter:
1. Click the ellipsis at the top right of the dashboard, then select Edit dashboard.
2. Navigate to the Filters button at the top left of the dashboard.

3. Select Add Filter—at this stage, you can also toggle Cross-filtering—and type in the field you want to filter on (e.g. Industry).

4. Under the Settings tab, you can title your filter and change the control (we recommend selecting Checkboxes).
5. The new filter will surface at the top of the dashboard.
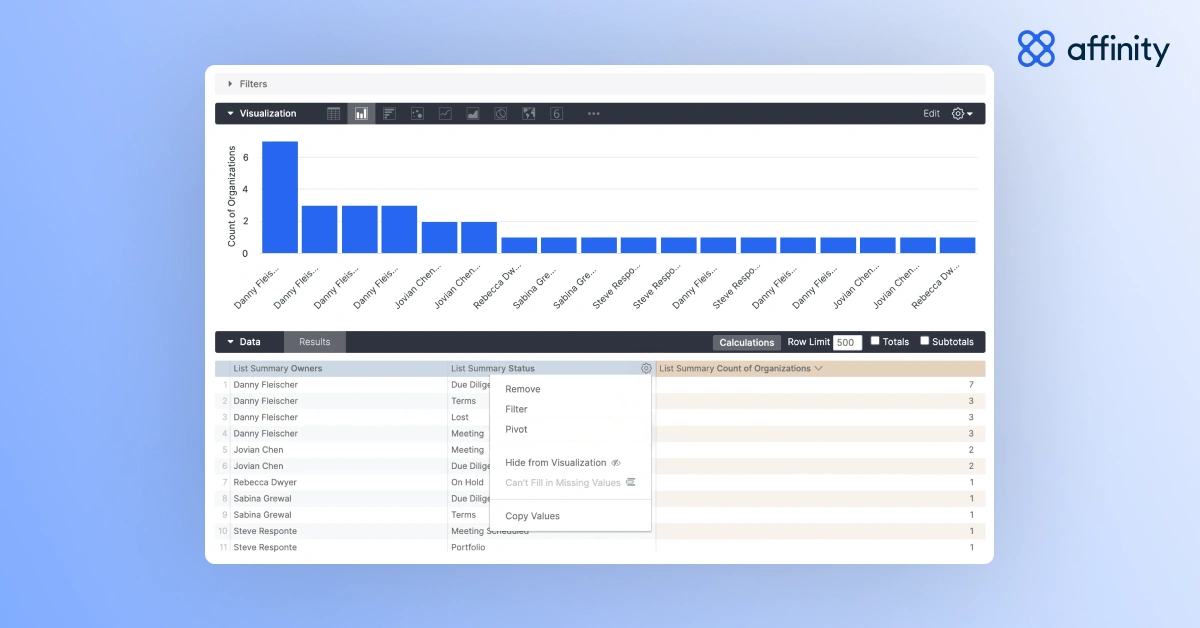
Pivoting your data
Similarly, pivoting your tiles helps you explore how different datapoints are related. For example, instead of just seeing how many deals were added to a deal list in a month, you can pivot by owner to spot performance trends for each team member over time.
To do this:
1. First, make sure you have a visualization tile set up with the following fields: Organization, Date added date (and select Month), and Owners.
2. To pivot the data, hover over the ellipsis of the field you want to pivot on (e.g. Owners), and select Pivot data.

3. You can also access the Pivot data feature via the Status field.
Pro tip: Download or schedule your report for later delivery to you or your team. For a refresher on how to do this, check out part 1 of our guide, Affinity Analytics for private capital: Getting started.
Best practices for using Affinity Analytics
Affinity Analytics helps private capital firms optimize their dealmaking processes by providing insights they can act on. In this section, we’ll walk through using the tool to improve pipeline visibility, streamline workflows, and ultimately close deals faster. These best practices will help your team stay aligned, measure performance, and make data-driven decisions.
Assess the quality of your pipeline
Affinity Analytics helps you quantify and monitor the quality of opportunities your team is pursuing. You can define what a Quality opportunity is based on your criteria—for example, an opportunity that reaches the due diligence or term sheet stage.
Then, you can track how many of your sourced deals meet that bar over time. This helps you measure the conversion rate from initial sourcing to close, pass, or loss, helping you evaluate the effectiveness of your sourcing efforts.

By visualizing this data across specific time periods, you can also benchmark your team’s efficiency using scores (e.g., the percentage of total opportunities you won). This lets you:
- Identify sourcing channels that yield the strongest pipeline
- Spot trends in deal progression across quarters or fund cycles
- Set meaningful KPIs based on historical conversion data
For example, if your efficiency score was 26% last month, it could mean better screening or more targeted sourcing efforts are needed—insights that help you scale what works.
Determine the most valuable deal sources
Affinity Analytics helps you uncover which deal sources drive the most value by tracking prospecting, dealmaking, and relationship management efforts across sources, sectors, team members, and more.
To understand where your best deals come from, start by tracking your deal sourcing categories, including portfolio companies, LPs, co-investors, accelerators, events, and more. For example, the data below shows that in June, July, and August, leads from portfolio companies drove the most pipeline.

You can display this data in multiple ways. Below, the same information is displayed in a bar chart and a table format, making it easier to spot which channels contribute most to your pipeline.

Once you’ve identified your most fruitful deal sources, you can compare deal sources against deal quality to determine which channels to further invest in and which to deprioritize. For example, maybe more prospects came from cold emails than from LinkedIn—but if LinkedIn leads convert at a higher rate, it is still a better long-term investment of your team’s time and resources.
Close deals faster
How long does it take to move a deal from awareness to the first meeting, or from the first meeting to close? While your team’s dealmaking efforts impact the strength of your pipeline, they also impact a founder’s experience of your firm: a drawn-out process might diminish a founder’s appetite to do business with you.
Knowing where deals slow down—by sector and stage—helps you spot friction early and keep the momentum going.
The chart below shows that decisions about deals in the Network Effects sector are taking the longest to move from due diligence to term sheet, while Pre-Seed investments are slower to move forward from the first introduction. The Industrial Tech industry pipeline moves more smoothly across each deal milestone than the other sectors.

Real-time analytics also allow you to surface key metrics— like win rates, time-to-close, and pipeline coverage. They give you a full view of your firm’s deal flow over time so you can course-correct quickly and close deals with confidence.
Keep your team aligned—and your deals moving
When teams don’t have visibility into stalled or aging deals, momentum breaks down. Affinity Analytics helps you spot those slowdowns and proactively close the gaps.
You can set up automated reports for your team based on deal status, so your team knows exactly when to follow up and schedule another meeting. For example, in the chart below, a report has been created for potential investments that have stayed in the introduction stage for 10 or more days.

These reports can be scheduled to land in inboxes automatically, reminding team members to reach out at the right moment. You can also export and share them as PDFs, PNGs, and direct view links. If you prefer to export them yourself, you can set recurring reminders, so you never miss sharing a weekly, monthly, or quarterly update.
Improve CRM adoption by making data easier to use
When dashboards are too manual, clunky, or incomplete, teams default to old habits—often skipping the CRM entirely. Affinity Analytics makes it easy for your team to access the insights they need in the tools they already use.
Viewing your custom reports in Affinity Analytics means that you can dig into the underlying data, filter or cross-filter by specific data points, and compare current and historical insights—all within Affinity.
With Affinity as your system of record, your team can:
- Track trends in deal sourcing and activity without leaving the platform
- Move seamlessly between high-level summaries and detailed KPIs
- Filter, cross-filter, and drill into data with ease
No more exporting spreadsheets or wrangling static reports just to get answers. With Affinity Analytics, your reports are live and interactive, making it easier for the team to engage with the CRM—and act on the insights it surfaces.
Make data a competitive edge with Affinity Analytics
Affinity Analytics isn’t just about tracking data—it’s about transforming that data into actionable insights that drive smarter, faster decision-making. With a comprehensive view of your pipeline and KPIs, Affinity Analytics empowers your team to act on data in real-time.
Personalized dashboards, automated reports, and deep insights allow your firm to customize the tool to fit your unique needs—whether that’s optimizing your pipeline, speeding up deals, or improving visibility across teams.
Top private capital firms use Affinity Analytics to continuously refine their strategies and make more data-driven decisions. With the ability to adapt to your evolving needs, Affinity Analytics helps your team stay one step ahead.
Ready to unlock the full potential of Affinity Analytics? Contact your customer success manager or customersuccess@affinity.co
{{request-demo="/rt-components"}}


